MP3: Simulating Flight
Due: March 21, 2022 @ 11:59 PM
Important Notes
Table of Contents
Overview
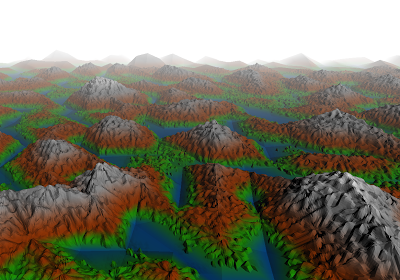
For the third machine problem, you will extend your terrain renderer with a simple flight simulator. Your “plane” will fly over the terrain you generate. You will also add the capability of applying fog to your terrain.
Simulating Flight
The app will be rendering a view of the terrain from the perspective of someone flying over it. The view should automatically move forward at a fixed speed. The user will control the roll and pitch of the airplane through the arrow keys. The controls should be:
- Pressing the left (right) arrow key will make the plane roll to its left (right)
- Pressing the up (down) arrow key will cause the airplane to pitch up (down)
- Pressing the + (-) key will increase (decrease) the airplane’s speed
- Pressing the ESC key will reset the current view to the initial viewpoint and direction
Implementation
You are required to use quaternions and to have the control behaviors match those described above. Our suggested implementation would be to do the following.
Representing Camera Orientation with a Quaternion
Use the glMatrix library provides support for using quaternions. We would suggest using that library instead of creating your own quaternion class.
Store four variables which maintain state from frame to frame. These are either global, part of a class, or passed as function parameters:
var camPosition = glMatrix.vec3.create();           //the camera's current position
var camOrientation = glMatrix.quat.create();        //the camera's current orientation
var float camSpeed = 0.5;                           //the camera's current speed in the forward direction
var camInitialDir = glMatrix.vec3.create();         //the camera's initial view direction
Important: You will need to find appropriate initial values for these variables. For example, you should not assume that camSpeed = 0.5; is appropriate for your app and terrain scale. Similarly, you will need to experimentally find good values for the amounts by which things like camSpeed are adjusted when a user presses a key.
User Interaction
Create a function function animate(timeStamp) that updates the camera every frame based on the user’s keyboard inputs. This function should be the provided callback before each redraw event…meaning you should call requestAnimationFrame(animate) at the end of thestartup function if you are using the starter code from MP2. You will also call requestAnimationFrame(animate) from inside animate(timeStamp).
Event Handling
You should write event handling functions for keyDown and keyUp events that you wish to capture. You can find the details of how to do this in the following:
Reference Basic JS Event Handling Video PDF
A keyDown event handler would look something like this:
/**
 * Logs keys as "down" when pressed
 */
function keyDown(event) {
  keys[event.key] = true;
}
Where keys is a global dictionary:
/** @global The currently pressed keys */
var keys = {};
You should register your event handlers in your initialization function (startup in the MP2 starter code):
document.onkeydown = keyDown;
document.onkeyup = keyUp;
This animate(timeStamp) function should check keys and take appropriate action. Here’s an example:
if (keys["="]) {
   camSpeed += 0.01;
}
if (keys["-"]) {
   camSpeed -= 0.01;
}
...
In animate(timeStamp) you will need to do the following:
- Increase or decrease
camSpeedif the + or - key has been pressed - Reset
camOrientationandcamPositionto their original values if ESC is pressed - Update
camOrientation - Update
camPosition
Handling Orientation Changes
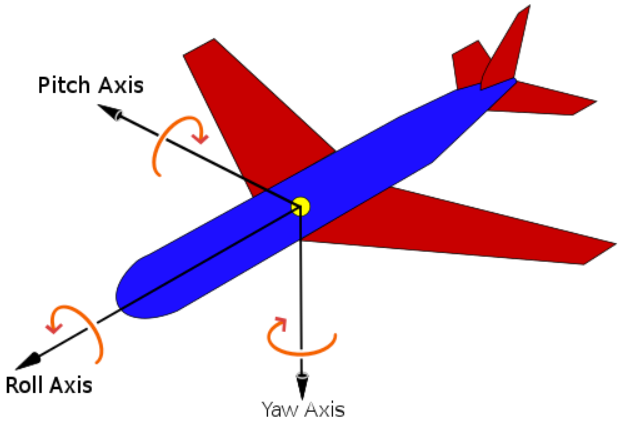
Imagine your view has a local coordinate system associated with it. We will associate roll as rotation around the local \(Z\) axis. We will associate pitch as around the local \(X\) axis. To update the current orientation of the view, we will generate an Euler angle representation of roll and pitch changes in response to key presses.
var eulerX = 0;
var eulerY = 0;
var eulerZ = 0;
// Capture key presses as euler angles
if (keys["a"]) {
	eulerX -= 1;
}
if (keys["d"]) {
	eulerX += 1;
}
...
We then do the following:
-
Create a quaternion from those Euler angles to represent the change in orientation
glMatrix.quat.fromEuler(orientationDelta, eulerX, eulerY, eulerZ); -
Calculate the new
camOrientationby multiplyingcamOrientationwithorientationDeltaYou should use
glMatrix.quat.multiply(out,a,b);and make sure you setaandbto the correct variables to generate the corect order of multiplication.
Handling Position Changes
You will update camPosition by calculating a displacement vector deltaPosition in the forward direction of the view and adding it to camPosition.
- Find the current forward direction by transforming the
camInitialDirbycamOrientationYou can useglMatrix.vec3.transformQuat(out,a,q)to generate current the forward directionforwardDirection. - Make
forwardDirectionunit length. - Set
deltaPositionto theforwardDirectionscaled to a length ofcamSpeed - Update
camPositionusingglMatrix.vec3.add(camPosition,camPosition,deltaPosition)
Generating an Updated View
Once you have a new camOrientation and camPosition you can generate a View matrix for the current frame.
You should use glMatrix.mat4.lookAt(out, eye, center, up) . Use camPosition for the eye parameter and generate correct values for center and up . To compute up, you should transform your initial up vector, usually \((0,1,0)\),by camOrientation. To compute center, the point in space at which you are looking, you should transform camIntialDir by camOrientation to generate the current view direction. You can than compute center as the sum of camPosition and the current view direction.
Transforming the Light Position
In MP2, a point light was defined at the constant position lightPosition in view coordinates. For this MP, you should define the light position in world coordinates. Each frame you should transform this position by the view transformation so that the light position used by the shader program will be in view coordinates. Note that if you do not transform the light position each frame, the light will appear to move with the viewer which appears unnatural.
A Documented User Interface
You should implement a user interface that minimally implements the arrow-key and +/- key controls described above. Your webpage should include text instructions describing how the user interface works. Simply include text in the HTML file that explains how to control the view and speed.
Rendering Depth Fog
Your app should allow a user to generate a scene with fog. The fog will be controlled by checkbox control on the webpage.
Modified Phong Shading
The fog computation should be done per-pixel, which means implemented in the fragment shader. The details of how to implement depth fog, along with shader code to do it, can be found in:
Make an effort to make the fog look good. Consider doing the following:
- Use a white background…or gray…
- Have the fog color match the background color
- Experimentally find a value for
fogDensitythat generates a good result.
User Interface
You should add a radio to your HTML as described in the Mozilla HTML Docs here
An example of how to do this would be:
<div>
<input type="checkbox" id="fog" name="fog" checked>
<label for="fog">Enable Fog</label>
</div>
To query to see if a box is checked in JavaScript you would do the following:
if (document.getElementById("fog").checked == true)
        {
            //update a uniform variable to let
            //fragment shader know whether or not to fog
        }
You can use a GLSL uniform bool or uniform int in the fragment shader to communicate whether or not the shader should generate fog.
Submission Instructions
Submit all the files needed to run your app including gl-matrix-min.js or similar library files
Submit the files in zipped folder to Canvas.
Use the following naming conventions for your files:
-
mpN.html
-
mpN.js
-
You can use any naming convention you wish for additional JS you use (e.g. Terrain.js or Sphere.js, etc.)
Test your app right before you submit and after renaming any files.
Not updating the name of a JS file file sourced in mpN.html is a common bug
In the file name, replace N with the number of the MP (e.g. MP1.html).
You should also include any additional files you use or have written.
In particular you can use the glMatrix library gl-matrix-min.js.
Name your submission as NETID_MPN.zip and submit it to Canvas, where NETID is your netid and N is the MP number. This MP (as are the other MP’s) is more than just an assignment for a grade to verify graphics programming proficiency. It is also an opportunity to impress me, your friends/family and your future employer or graduate school.
| Name | Points | Description |
|---|---|---|
| Fog | 5 | User can enable/disable distance fog in the scene. |
| Documented User Interface | 5 | Controls for the camera are described clearly. |
| Roll | 10 | User can change the roll of the current orientation. |
| Pitch | 10 | User can change the pitch of the current orientation. |
| Forward Motion | 10 | Viewpoint advances in the forward direction at the current speed. |
| Ability to Change Speed | 5 | User can control rate of forward motion. |
| Ability to Reset the View | 5 | User can reset the view to its default position and orientation. |
| Total | 50 |