MP4: Texturing Mapping
Due: April. 13, 2022 @ 11:59 PM
Important Notes
Table of Contents
Overview
For the fourth machine problem, you will implement a simple OBJ file reader and use it to read and render a mesh. You will also add support for texture mapping an image onto the mesh surface.
Starter Code
Parsing an OBJ File
You only need to implement a reader that parses a subset of the full OBJ format. You just need to handle the tags f, v and #.
A concise description of the format and how to parse it can be found here:
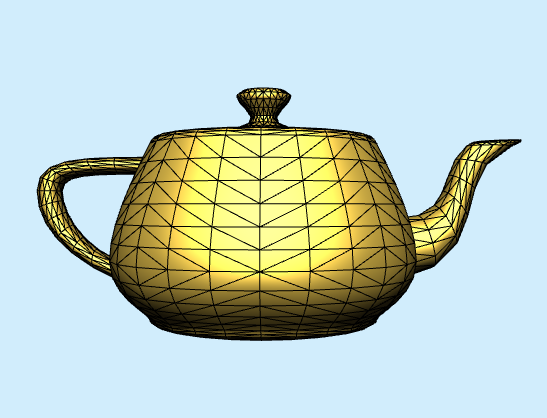
Use the above linked teapot model, which consists only of vertices and triangular faces. Load the vertices into a vertex position array, and the triangle faces into a face array whose elements are triples of vertex indices. Note that the indices of the vertices in the OBJ start at 1. This means you will need to adjust them assuming your arrays start indexing at 0. You will need to create per-vertex normals for the mesh as well, which you should compute as the average normal of the the triangles incident on the vertex.
Implementation
You should complete the function loadFromOBJ(fileText) in the file TriMesh.js . You will likely find the JS string method split useful. A robust way to split handling white space is to use the separator /\b\s+(?!$)/
You also need to complete the function canonicalTransform() in the file TriMesh.js. This function generates a transformation matrix this.modelMatrix where the transformation is \(M=ST\) The \(T\) matrix translates so that the center of the axis-aligned bounding box (AABB) is at the origin. The matrix \(S\) scales uniformly by \(1/L\) where \(L\) is the length of the longest side of the AABB.
Once you have completed that code, you should be able to render the teapot as seen above.
When debugging, you might want to use the triangle.obj file which contains a single triangle.
Running a Local Server
Typically, for security reasons your browser will not allow JS code to directly access files on your local file system. To get around the issue of reading files from the local filesystem, it is best to test by running a local webserver. There are three relatively easy ways to do this:
- If you use the Brackets editor, the live preview function will start up a server (and browser) to test your code. Just have Chrome open, and the open your html file in Brackets. Click the lightning bolt icon in the top right of the Brackets window.
- Alternatively, you can install node.js Then install and run httpserver to serve the directory that you are in when you issue the command
- if you have python on your system, use a command prompt to do
python2 -m SimpleHTTPServerorpython3 -m http.serverwhich will serve files from the directory in which you issued the command. These will typically be served athttp://127.0.0.1:8000.
Texture Mapping
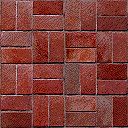
Now we will load an image to use as a texture and send it to the fragment shader as a uniform. You can use the file brick.jpg or a different image if you wish.
We will start by creating a global variable for the texture:
/** @global Image texture to mapped onto mesh */
var texture;
Then we need a function to load the image from the file into a WebGL texture:
/**
 * Load a texture from an image.
 */

function loadTexture(filename){
	// Create a texture.
	texture = gl.createTexture();
	gl.bindTexture(gl.TEXTURE_2D, texture);

	// Fill the texture with a 1x1 blue pixel.
	gl.texImage2D(gl.TEXTURE_2D, 0, gl.RGBA, 1, 1, 0, gl.RGBA, gl.UNSIGNED_BYTE,
              new Uint8Array([0, 0, 255, 255]));

	// Asynchronously load an image
	// If image load unsuccessful, it will be a blue surface
	var image = new Image();
	image.src = filename;
	image.addEventListener('load', function() {
  		// Now that the image has loaded make copy it to the texture.
  		gl.bindTexture(gl.TEXTURE_2D, texture);
  		gl.texImage2D(gl.TEXTURE_2D, 0, gl.RGBA, gl.RGBA,gl.UNSIGNED_BYTE, image);
  		gl.generateMipmap(gl.TEXTURE_2D);
  		console.log("loaded ", filename);
		});
}
Then, in startup we will want add code call loadTexture and send the texture to a uniform variable:
// Load a texture
  loadTexture("brick.jpg");
  // Tell WebGL we want to affect texture unit 0
  gl.activeTexture(gl.TEXTURE0);
  // Bind the texture to texture unit 0
  gl.bindTexture(gl.TEXTURE_2D, texture);
  // Tell the shader we bound the texture to texture unit 0
  gl.uniform1i(shaderProgram.locations.uSampler, 0);
Finally, in setupShaders you need to get the location of the uniform for the texture in the shader program:
shaderProgram.locations.uSampler =
    gl.getUniformLocation(shaderProgram, "u_texture");
Generating Texture Coordinates
In the shader, we need to generate texture coordinates at each fragment and use those to map into the image and sample a color. One way to do this would be to have the JS code use some mathematical function mapping between the mesh shape and the rectangular image to generate per-vertex texture coordinates. High quality texture mapping will often take this approach, using shape specific texture coordinates for the model that were generated by an artist.
We will use a simpler, but more performant approach and generate texture coordinates directly in the shader for each vertex using orthographic coordinates.
In the vertex shader we will add a varying that we will send to the fragment shader:
out vec2 v_texcoord;
And we will simply use the model space xy coordinates as texture coordinates in the body of the shader code:
v_texcoord = vertexPosition.xy;
You should try an experiment and determine what happens if you use the view coordinate xy values instead…you may need to rotate the teapot (see the next section). This is the kind of thing you might get asked about on exam.
In the fragment shader we just need to take in the uniform holding the texture and the interpolated texture coordinates:
uniform sampler2D u_texture;

in vec2 v_texcoord;
and in the body of the fragment shader we sample a color from the image:
// Sample the texture
vec4 texColor = texture(u_texture, v_texcoord);
Phong Shading
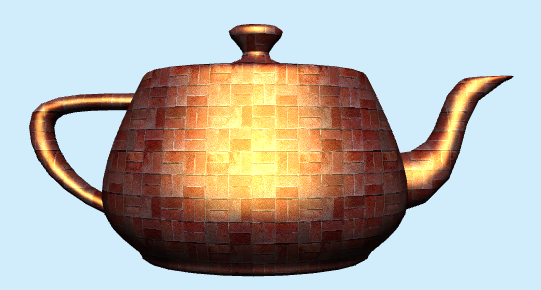
You should shade the color sampled from the texture so that it looks like it is really in the 3D scene you are drawing. This means that you should use the sampled color texColor.rgb from the texture in place of kAmbient and kDiffuse in the reflection model…effectively making it the material color. Since specular highlights are usually white, it would make sense to keep kSpecular as white. Once this is in place you should see something like this:
User Interaction Using a Mouse
The model should rotate around the Y (up) axis if a mouse button is being held down and the mouse moves in the X direction.
To accomplish this you should add the following global variables:
/** @global Is a mouse button pressed? */
var isDown = false;
/** @global Mouse coordinates */
var x = -1;
var y = -1;
/** @global Accumulated rotation around Y in degrees */
var rotY = 0;
And then add event listeners for mousedown, mouseup, and mousemove events. Here’s an example for handling mousedown:
canvas.addEventListener('mousedown', e => {
    x = e.offsetX;
    y = e.offsetY;
    isDown = true;
  });
This code assumes that the canvas variable is a reference to the HTML canvas object that is accessed in the startup function. You should add this code and the code for the other two event listeners in the startup function.
The value e.offsetX is the location of the mouse pointer when the event happens. The HTML5 canvas coordinate system has the origin in the top left corner as shown here:

When a mouse button is down and the mouse moves, you should take the difference e.offsetX - x and add it to rotY. You should also update the global x and y variables to the values e.offsetX and e.offsetY.
In the draw function, you should apply a Y rotation to the model before applying the view transformation:
glMatrix.mat4.identity(modelViewMatrix);
glMatrix.mat4.rotateY(modelViewMatrix,myMesh.getModelTransform(),degToRad(rotY));
glMatrix.mat4.lookAt(viewMatrix, eyePt, lookAtPt, up);
glMatrix.mat4.multiply(modelViewMatrix, viewMatrix, modelViewMatrix);
References
Submission Instructions
Submit all the files needed to run your app including gl-matrix-min.js or similar library files
Submit the files in zipped folder to Canvas.
Use the following naming conventions for your files:
-
mpN.html
-
mpN.js
-
You can use any naming convention you wish for additional JS you use (e.g. Terrain.js or Sphere.js, etc.)
Test your app right before you submit and after renaming any files.
Not updating the name of a JS file file sourced in mpN.html is a common bug
In the file name, replace N with the number of the MP (e.g. MP1.html).
You should also include any additional files you use or have written.
In particular you can use the glMatrix library gl-matrix-min.js.
Name your submission as NETID_MPN.zip and submit it to Canvas, where NETID is your netid and N is the MP number. This MP (as are the other MP’s) is more than just an assignment for a grade to verify graphics programming proficiency. It is also an opportunity to impress me, your friends/family and your future employer or graduate school.
| Name | Points | Description |
|---|---|---|
| OBJ File Reader | 5 | OBJ file for the teapot is parsed correctly and loaded into buffers |
| View | 10 | The view of the teapot shows the entire mesh and is non-distorted |
| Generate Texture Coordinates | 10 | Appropriate per-vertex texture coordinates are generated for the teapot |
| Texture Mapping | 10 | Teapot is texture-mapped using an interesting image texture. |
| Shading | 5 | Phong shading and the Phong reflection model are used and the teapot is well-lit |
| Model Rotation Using a Mouse | 10 | Mesh can be rotated using mouse movement |
| Total | 50 |